We're gonna make good stuff

Foodbuzz

Knuckle Salad is about fun ways to cultivate a creative kitchen, a cheerful home, and a healthy lifestyle... in as casual a way as possible.

Get The Latest News

Sign up to receive recipes by email:

KnuckleSalad.com

food, crafts, food that looks like crafts, and crafts made into food

Tuesday, April 13, 2010

Sneaky eggplant jambalaya


Lately, the threat of crippling sniffles has kept me mostly indoors. That trapped feeling has helped me finally remember to pack a lunch before work. I've even started thinking about weekday lunches when I'm preparing dinner! (Like when I got some extra wonton soup, pictured, from the Chinese delivery place over the weekend. What? Ordering counts as preparing.)

Jambalaya makes tons of leftovers and reheats really beautifully, shrimp and all. Since I've been on sort of a superfood kick lately, I decided to make up a version that sneaks in a bunch of good-for-you things.

Like eggplant.

Hear me out.

You'd never know there's eggplant in it. It lends a little extra richness to the overall flavor, but then it disappears like a spectre into the shadows, leaving behind only a high-mineral-high-fiber memory. That's right! You're getting healthy off memories here!

I snuck some quinoa in, too, which looks pretty and makes you feel good about how much protein you're getting. If you don't have any on hand, skip it, no harm done. But if you do, throw it in. What else you got? Cranberries? Go for it, they're catabolic! What, no yogurt?

Just kidding. Ha, ha! Please don't put cranberries in your jambalaya. Also yogurt. Maybe just... follow the recipe.


Sneaky Eggplant Jambalaya

  • 1 lb hot turkey Italian sausage, cut into chunks
  • 1 lb shrimp, peeled, shells and tails reserved
  • 1 large eggplant
  • 1 large onion, diced
  • 1 green bell pepper, diced
  • 3 stalks celery, diced
  • 4 cloves garlic, minced 
  • 1 bay leaf
  • 1 tsp ground cloves
  • 4 cups rice
  • 3/4 cup raw quinoa, rinsed
  • Cayenne pepper to taste
  • Olive oil
  • Water
  • Chicken stock (optional)
  1. In a medium pot, boil shrimp shells and tails in 4 cups water, along with a couple of tablespoons each of your diced onion and diced celery, the bay leaf, and the cloves. Reduce the heat and allow it to simmer for about 45 minutes, then strain into a bowl and discard the solids. Set aside.
  2. Meanwhile, peel the eggplant and cut it into 1" cubes. Set aside (it may oxidize and brown, but that's all right).
  3. In a big, shallow pot or deep pan, heat about a tablespoon of oil over medium-high heat and add sausage. Brown sausage, remove to a bowl, and set aside.
  4. Quickly add onions, peppers, celery, and garlic to the hot pan and cook until vegetables begin to stick to the pan, stirring frequently to prevent the garlic from browning. Toss in eggplant and saute for 5–10 minutes. Pour 2 cups of the shrimp stock over vegetables and allow to reduce by half.
  5. Stir in rice and quinoa. Season with cayenne pepper (add additional seasonings, such as garlic powder, as desired).
  6. Put the cooked sausage and the raw shrimp into the pot.
  7. Add the remaining 2 cups of fish stock and any additional water (or, if you rather, chicken stock) needed to completely cover the rice. Return to boiling, then reduce heat to medium-low and allow to simmer for 25–35 minutes or until rice is tender. Check periodically to make sure there's still some liquid in there; if there isn't, add more, 1/4 cup at a time, to ensure correct cooking.
  8. Serve hot. The eggplant will have become very soft, so if you wish to eradicate the eggplant evidence, some extra stirring should take care of that. When storing leftovers, allow jambalaya to cool to room temperature before placing in an airtight container in the fridge.
»»  read more

Sunday, April 11, 2010

Banana fritters


We forgot about the bananas again.

With little more to work with than two overripe bananas and a zucchini from John's mom, who had bought zucchini in bulk and quickly grown extremely tired of zucchini, I wasn't sure I'd be able to figure out anything delicious to make. But I noticed that people do seem to like banana and zucchini together in bread form, so I started to wonder if there was some other non-bread way to make that happen.

A recipe for Spicy Banana Zucchini Balls, which I found on Cafe Nilson, made all the sense in the world. Fritters! Yum! Curry... probably also yum, but not what I was in the mood for. I felt like something sweet, not a savory banana adventure. But after a few quick tweaks and 15 minutes in the kitchen, I had a sweet, crispy, delicious banana fritter dessert, with soft smooshy insides. It's got oats and zucchini (good for you!) but it's also fried in oil (um), so I'm not sure what kind of health-rating I can hope to net here. What do you think?

Sweet Banana Zucchini Fritters

  • 1 cup coarsely grated zucchini, squeezed dry
  • 1 large banana, mashed
  • 1 egg, beaten
  • 3 tbs honey
  • 2 tsp vanilla extract
  • 1/4 tsp baking soda
  • 1/4 cup oats
  • 1/2 cup panko breadcrumbs
  • 1/2 cup flour (more if required)
  • vegetable oil for frying
  1.  Mix everything together (well, everything but the vegetable oil, geez) in a pretty big bowl. When it's all in, you should aim for a consistency somewhere between batter and dough, so you might need to add more flour if the mixture is too runny like a batter. You definitely shouldn't be able to roll a ball out of your dough, but when you drop it in the pan, you don't want it to spread out like a pancake, either.
  2. Heat some oil (less than 1/2" is plenty) in a big pan over medium-high heat. 
  3. Drop a blob of batter (a heaping tablespoon or more, depending on the size of fritter you want) into the pan. You can do more than one at a time, of course, but be certain to keep a vigilant eye on all of them. Let them brown, then roll them around so you can get them crispy on all sides, but not too dark. When a fritter is cooked, remove it from the pan and set it on a paper towel to drain.
  4. Serve hot with extra honey for dipping.
»»  read more

Keen on quinoa


Quinoa looks to be gaining popularity as a trendy food. Let's keep that going, everybody, because quinoa is incredible and we should be eating it all the time. I truly don't understand why I had never heard of this stuff until maybe last year. Unless... is this a massive hoax? Was quinoa secretly developed in a lab in 2007 and given a false history to help make it credible? Did a handful of scientists hire a team of actors to pose as Inca-descended quinoa eaters in South America and instruct them to tell everyone their people have been eating quinoa for 6,000 years? If so, what are they paying these actors, and how can they afford it when quinoa is at Whole Foods for only $5 a bag?

Important questions, but let's set them aside for the moment and just appreciate how delicious and super-crazy-nutritious quinoa is. Because for carb-lovers like me, a grain that doubles as a complete protein really does seem too good to be true, and if it's for real then who cares where it came from? EAT IT.

I got this recipe for quinoa pilaf from Dinna with Donna, a blog where a bunch of my favorite recipes come from. She's a dietetic technician, so I know I can trust her recipes to be good for me. Some of that trust may also derive from the fact that she's my mom.

At any rate, this is my favorite way to prepare quinoa. It's really tasty (the vegetables do a good job of keeping the quinoa company, since the flavor of quinoa on its own is a little shy). Plus, once you've got your quinoa cooked, it takes less than ten minutes to get it on the table, which seems like a bonus to me because of all the times I can remember trying to get a whole meal to be ready at the same time and all of a sudden I realize the fish is done and oh my god where is the rice.

Quinoa pilaf would never do that to you.

Quinoa Pilaf

Ingredients
  • 1/2c fresh carrots, diced
  • 1/4c fresh celery, diced
  • 1/2c fresh peppers, diced (red, yellow, green, hot)
  • 2 cloves garlic, minced
  • 2 tbsp butter
  • 2 tbsp olive oil
  • 6c Quinoa, cooked using basic recipe (on the package)
  • 1/4c green onions, diced
  • 1c almonds, slivered (but I used sliced)
  • 1/4 tsp oregano
  • Salt and pepper to taste
Preparation
  1. In a large skillet, saute the diced carrots, celery, peppers and garlic in butter or olive oil until crisp.
  2. Stir in the oregano and green onions.
  3. Add the cooked quinoa. Season to taste with salt and pepper.
  4. Add almonds and serve. SO EASY.
»»  read more

Monday, April 5, 2010

Martha Stewart's Friend's Thai Chicken Soup

One day at the gym last year, I forgot my headphones and got stuck on the elliptical machine with nothing but the YMCA's slim collection of discarded magazines to entertain me. I had two hundred parenting magazines and a Martha Stewart Living to choose from. So.

First, I learned about tomato gardening. It's not a particular interest of mine — I'm a terrible gardener and I don't love tomatoes — but for the next week, I knew a whole lot more about tomatoes than I usually do. (I kept most of it to myself. I hate to come off as a tomato snob.)

Then I read an appallingly pretentious article about this appallingly pretentious person who has her pretentious friends over for appalling wine-tasting "parties" where they play little wine-tasting party games (e.g. covering the bottles in a paper bag and guessing which wine is inside just by the taste!) for a big, pretentious laugh. It was apparent that the author had never heard of fun before in her life.

The third thing I read in Living was a recipe for some very, very complicated soup. It involved day-ahead preparation, making your own stock, and all sorts of crazy things that only Martha Stewart or some destitute-but-haughty pioneer family would do, if they had had access to soba noodles and kombu..

But it sounded delicious.

So I followed the recipe, adjusting here and there to accommodate, you know, reality. I made it again later, and switched the napa cabbage out for Swiss rainbow chard, because chard is in season and is crazy nutritious. I made some other adjustments, too, to make it quicker and less fussy—because at one point, the original recipe had me counting mushrooms as I served the soup. I felt like such a patsy.

And the soup? Good, quite. Different for me (I don't know Thai so I don't cook it) but good. Here's the original recipe, and below, the same recipe with my adjustments. It still teeters on the edge of too time-intensive for me, but it's definitely doable, and since I can make enough for leftovers during the week, I get to see a return on that initial time investment.

Ingredients

Serves 4

  • 4 chicken legs or 2 breasts
  • 2 sheets kombu, trimmed into 1-inch squares
  • 1 small package fresh shiitake mushrooms
  • 1 medium onion, diced
  • 3 scallions, stems trimmed, chopped
  • 3 garlic cloves, minced
  • 1 piece (3 inches) ginger, grated
  • 1 jalapeno pepper, minced
  • 1 medium carrot, julienned... or a handful of baby carrots
  • 4–5 units (...?) of Swiss chard
  • 8 ounces soba
  • 4 tablespoons soy sauce
  • 2 tablespoons sake
  • 12 large shell-on shrimp (optional)
  • 1 package (14 ounces) firm tofu, drained, patted dry, and cut into 1-inch cubes (optional)
  • Chile sauce for serving

Directions

  1. Buy all the ingredients. Might have to go to Whole Foods for that, might not.
  2. Start with the chicken. Place chicken in pot with onions, ginger, jalapeno and garlic, fill up with water enough to cover the chicken, and bring to a boil. 
  3. Prepare the chard by trimming the leaves off the stems, setting aside the leaves, and chopping the stems into 3/4" pieces. Toss the stem bits into the pot.
  4. Add any additional (optional) seasoning to the pot, then keep at a light boil until the chicken appears to be cooked through.
  5. Add kombu, shiitakes, onion, scallions, and carrot to the pot. If necessary, add enough water to cover. Reduce heat, and simmer, covered, for 1 hour.
  6. If you like clear soup, strain broth into a second pot. Reserve mushrooms, chicken, chard stems, and any other solid pieces you like the look of; discard the rest.
  7. Slice the mushrooms. Pull the chicken from the chicken bones and shred it. Return the meat to the pot and discard the bones. 
  8. Cook soba according to package directions and toss it in a large bowl with oil or a ladleful of broth to keep it from sticking.
  9. Add soy sauce and sake to broth, and return to a boil. Tear up the chard leaves into reasonable (about 1–2") pieces and toss them into the pot to wilt. 
  10. Add shrimp and/or tofu (if using), and boil until cooked through, about 2 minutes. Catch and peel shrimp, leaving tails intact.
  11. Serve with individual ramekins of chili sauce so that everyone can add as much heat to their bowl as they like.
»»  read more

Sunday, April 4, 2010

Bacon and egg rolls


I love southwest egg rolls so much. I always order them if I see them on the menu. I like regular egg rolls, too, the Chinese kind, with all the crunchiness and shrimp and stuff. In fact, you could say that I've long been a fan of the egg roll, but never a student. No way. Too complicated.

What I didn't know was that egg rolls actually don't involve any kind of mystical tradition handed down between generations in the mysterious Far East. Or maybe they do, but you don't need to be privy to it in order to make some.

You just go look by the tofu and buy a pack of egg roll wrappers. Then you can pretty much make any kind of crazy egg rolls you want.

I started with southwest egg rolls. And they. Were amazing.

I made up the filling (seemed simple enough), and then skipped the deep frying. That's right, they're not deep fried! I mean, they are definitely fried in oil, so I don't expect anyone to stand up and deliver a toast to my stunning ability to cut back fat from traditional dishes, but they're not deep fried and there's got to be at least a medal or a plaque or something coming to me for that.

For dinner, I served these egg rolls with bacon-fried yellow rice and maduros, along with a chipotle sour cream and a lime sour cream for dipping. And beer. It was awesome. For breakfast? Same recipe, but I added scrambled eggs to the filling, and served them with bacon. Okay, and yeah, I still included that chipotle sour cream. But no beer. Don't be gross.

Southwest egg rolls

  • 2 boneless, skinless chicken breasts
  • 1 medium onion, diced
  • 1 small jalapeno pepper, diced
  • 2 cloves garlic, minced
  • 6 oz. canned yellow corn, drained
  • 1 8 oz. can black beans, drained
  • Shredded cheese (I like the Mexican Four-Cheese Blend)
  • Egg roll skins/wrappers
  • Olive oil
  • Canola/vegetable oil
  • Spices (Cumin, cilantro, oregano, saffron recommended)
  • 3 scrambled eggs (if you're making breakfast; otherwise, omit!)
  1. Cook the chicken. Tip: It's a good idea to marinate it ahead of time, up to about a day, in the fridge. (I used olive oil, white wine vinegar, minced garlic, black pepper, and cilantro.) After that, you can cook your chicken however you like. I sauteed mine on the stove, but had I the option, I'd definitely have grilled it. Up to you. Just cook your chicken and set it aside to cool.
  2. Heat about a tablespoon of olive oil in a big pan over medium-high heat. Put the onion and pepper in and saute them, stirring frequently, until the onion begins to turn translucent. Add the garlic and saute for another 30–60 seconds, making certain not to brown it.
  3. Add the beans to the pan and heat through. Mash about 1/4 of the beans up a bit with the back of your spoon.
  4. Add the corn to the pan as well. Cook, tossing often, for about 5 minutes. Remove from the pan into a bowl and allow to cool slightly. Wipe the pan out a bit if there are bits still in it; you'll want this pan to fry the egg rolls.
  5. While your filling cools, study the illustrations on the back of your egg roll package if you haven't rolled them before. They are very helpful.
  6. Roll 'em up. Lay a wrapper out (while you're working with one, you should keep the rest either sealed up in a zip-loc or hidden under a damp towel, to keep them from drying out). Place a couple of spoonfuls of filling (including egg if you're using it) in the middle of the diamond, sprinkle some cheese on, roll it up, wet the flap, seal it, and place it flap-side-down on a tray or cutting board.
  7. When all your egg rolls are rolled up, heat about 1/2 inch of canola oil in your pan again over medium-high. (If you were deep frying, you'd want it at 350, which sounds pretty hot.) Prepare a place for the finished egg rolls to go, like a big plate with some paper towels on it, to drain the oil. 
  8. When the oil is hot enough, use tongs to carefully place as many egg rolls as will comfortably fit (no touching!) flap-side-down. By the time you get them all in, it may be time to turn the first one over, so be vigilant! As they begin to brown, flip them over. Once the reverse browns, you should be able to stand them on their sides so they brown all the way around. The ends won't get fried, but you won't notice. Once they're nice and brown and crispy all the way around, gently remove them from the pan and place them in the paper towel nest that you made for them. Let them sit for five minutes so nobody will get burned.
  9. Serve!
»»  read more

Saturday, April 3, 2010

Happy Easter! Give me your tie!


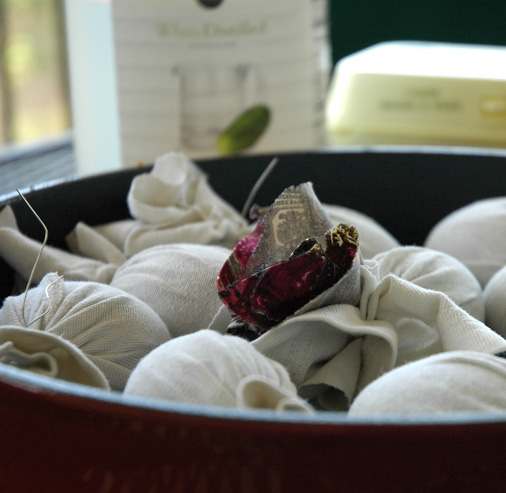
You may have heard of silk-dyed easter eggs, because it's a two-year-old Martha Stewart craft. That is, it was published on her site two years ago. It's not for two-year-olds. It's easy to do, but it's not that easy. It involves eggs. And scissors. If you have a two-year-old you'd probably better go ahead and lock him in the bathroom or whatever you do to secure a toddler. This stuff isn't safe.

The project came to my attention for the first time a couple of weeks ago, in the form of a mysterious kit being sold on Etsy that included twelve scraps of silk and some twist ties. Once I figured out what the hell I was looking at, I was impressed. I checked it out on Our Best Bites, the Mom Blog Network, and a bunch of other blogs (did you know that everyone and their mother has blogged this project except me? and my mother? Mom, looks like you're next). I read about it so many times, I started to feel like I had done it myself. A hundred times. I'm an old pro at this, I thought! Might as well give it a shot.

So I bought three ties at a thrift store and a dozen eggs from the grocer (the cheap kind, because I thought they might get ruined, and/or I'd forget to eat them and/or I'd be afraid to) and got to work.


Cutting the ties was easy. Lots of stitches, yeah, but it turns out neckties are constructed very simply, so you only have to snip maybe three stitches per seam and you're home free. Once I cut them into squares big enough to wrap an egg, I was able to get three per tie. So I should have bought one more.


Wrapping the eggs (with the good side of the tie face in, touching the egg) was easy, too. If you don't have any twist ties, I figured out you can some old beading wire, which works great although it isn't as easy on the fingers. But whatever, because I got it done, and John gave me an old t-shirt to cut up and I wrapped the little eggs up in their little shirts and that was it, pretty much, project done.


The eggs went into a pot with some water and vinegar, came to a boil, and simmered for 20 minutes while I wandered off to do something else. I turned the heat down a little too low, though, so at the end I turned it up again and gave them an extra five minutes. Since I pulled one egg out to test before the final five minutes, I found out for a fact that it made a difference for the better. So now we know. Looks like my impatience has paid off once again! You can thank me later, science.


They turned out so beautifully! The brightest, most vibrant colors transfer the best, but it's the surprises that are really fun. The tie I thought was the ugliest, in the mustardy-gold color with magenta spots, came out in a light springy green for no reason I can see at all. It must be an Easter miracle.


The one I thought would be un-Eastery because it was a small, dark geometric print proved to be super cool looking. It's kind of grey-blue with yellow, but it doesn't look dark at all, and the geometric dots combined with the organic wrapping pattern is great.


And the last tie—hideous tie—was printed in loud magentas and purples and golds with postage stamps and postmarks and not only did the colors transfer beautifully, but look! Is that a queen I spy on my egg?


I figure my eggs probably won't get eaten. Come on, leave me alone. I feel bad enough already. But nowhere on any of my tie labels did it say, "Go ahead, eat this tie, you'll be fine." I checked twice. Martha and the Internet both seem pretty sure it's safe, but I don't know. You know?

Anyway. Happy Easter!
»»  read more

Sunday, March 28, 2010

Banana Muffins: Crumbly, sweet, also kind of good for you

I think it's okay when we accidentally let our bananas slip our minds. It means we're about to have some over-ripe bananas, and over-ripe bananas mean delicious banana baking, which means delicious banana dessert eating, and that is relevant to my interests.

Usually, I just set-and-forget a loaf of banana bread, but this time I wanted to find something a little different to try. I was definitely against banana muffins. They sounded boring. I've had them before. They're good. But they're no big deal. They're like single-serve banana bread. Didn't I just say I didn't want banana bread?

But then I noticed a lot of people on Internet were talking about banana crunch muffins. As a matter of fact, no fewer than four of my Page 1 search results pointed to different blogs reprinting the exact same recipe. I tracked down the Allrecipes recipe where I think a lot of blogs are getting it, and found thousands of comments and stars and favorites and reviews. It was beginning to look like banana muffins might be worth considering after all.

Still, as nice as it sounded, I wasn't sold. If I was going to make muffins, I wanted oats in there. Oats are important. They give a muffin credibility. Breakfast credibility. So the hunt continued until I found these muffins from Cheap Healthy Good, a blog I find utterly fantastic, with solid recipes, handy-dandy calculations on each, and a delightful personality. (Not to change the subject, but while you're there, check out The Brown Bag Brigade for some really good ideas on packing a lunch. I love it.)

I had to make a few substitutions in the basic banana oat muffin recipe based on what I had in the house. I have no oat flour, for instance, and the food processor is just too high up for me to get to — by design, because I hate having to use it — so all-purpose flour it is.

But just to make sure my muffins would be all the way glamorous, I also added the crunchy crumbles from the Penzey's Spice Catalog recipe I found via Adventures Recipes. (It makes enough for two dozen muffins, so if you wish to be reasonable, you might halve it; I didn't.) If there's one thing I know about muffins, it's that you have to have crumbles if you want them to be their best. They're like the muffin equivalent of sexy high heels. Delicious high heel shoes made of butter. As a muffin, you cannot go wrong with these.

The muffins turned out very dense, very moist, very sweet, just like banana bread. I admit I went a little crumble-crazy, so although the crumbles are the perfect thing for these muffins, I might back it off just a little bit next time. I guess I just got excited. I mean...butter shoes, you know?

Banana Oatmeal Crumble Muffins (Makes 12)

Ingredients:

  • 1 1/4 cup rolled oats
  • 1/2 cup sour cream
  • 1/2 cup milk
  • 1 1/2 cups all-purpose flour
  • 1/2 teaspoon cinnamon
  • 1/2 teaspoon nutmeg
  • 1/2 teaspoon salt
  • 2 teaspoons baking powder
  • 1 teaspoon baking soda
  • 1/2 cup brown sugar, lightly packed
  • 1/3 cup vegetable oil
  • 2 large ripe bananas, mashed
  • 1 large egg, lightly beaten
  • 1 teaspoon vanilla extract
For the crumbles:
  • 1 cup all-purpose flour
  • 2/3 cup brown sugar, firmly packed
  • 1 teaspoon cinnamon
  • 1/2 cup cold butter, cut in small cubes
    1. Preheat oven to 400°F.
    2. In a large bowl, stir oats, sour cream, and milk together until combined. Set aside for 10 minutes.


    3. In a medium bowl, whisk together flour, cinnamon, nutmeg, salt, baking powder, and baking soda. Set aside.
    4. To the oat/sour cream mixture, add brown sugar, vegetable oil, bananas, egg, and vanilla extract. Stir to combine. Add flour mixture. Stir until just moistened. The batter will be very, very thick.
    5. Spray a 12-cup muffin pan with cooking spray (or use muffin cups). Evenly distribute batter among cups.
    6. For the crumbles, mix together the flour, brown sugar, and cinnamon in a bowl (remember the bowl you had your flour in before? use that one again now! unless you love washing dishes). Add the cold butter and cut it into the dry ingredients until it resembles coarse crumbs. Divide the crumbles, in whatever amount you prefer, over all the muffins. If you use tons of crumbles like I did, be sure to put a cookie sheet on the shelf below your muffin tin, to catch any melty overflow.


    7. Bake 18-20 minutes, until crumbles are golden brown and muffins pass the toothpick test. Remove from oven and cool in pan for 5 minutes, then remove them from the pan and place them in a dish to cool. Enjoy warm or let cool completely.
    »»  read more